The Spock Framework is a testing and specification framework for Java and Groovy applications. Its website make a somewhat bold claim:
What makes it stand out from the crowd is its beautiful and highly expressive specification language.
Before we can verify if this claim is true, we have to create an example project that we can use for this purpose.
The previous part of this tutorial described how we can do this by using Maven. Now we will learn how we can do this by using Gradle.
This blog post describes how we can create a Gradle project that fulfils the following requirements:
- It must support “normal” unit tests that use JUnit and unit tests that use the Spock Framework.
- It must compile and run the “normal” unit tests that are found from the src/test/java directory.
- It must compile and run the Groovy unit tests that are found from the src/test/groovy directory.
- It must create an HTML test report that describes the test results of our unit tests that use the Spock Framework.
Let’s start by getting the required dependencies.
Additional reading:
If you are not familiar with Gradle, you should read the following blog posts before you continue reading this blog post:
- Getting Started With Gradle: Introduction helps you to install Gradle, describes the basic concepts of a Gradle build, and describes how you can add functionality to your build by using Gradle plugins.
- Getting Started With Gradle: Our First Java Project describes how you can create a Java project by using Gradle and package your application to an executable jar file.
- Getting Started With Gradle: Dependency Management describes how you can manage the dependencies of your Gradle project.
Getting the Required Dependencies
We can get the required dependencies by adding the following dependencies into the testCompile configuration:
- JUnit (version 4.12) is a framework that allows us to write both unit and integration tests.
- Spock Core (version 1.0-groovy-2.4). Spock is a testing and specification framework for Java and Groovy applications.
- Groovy All (version 2.4.4). Groovy is a dynamic programming language for the JVM.
After we have added these dependencies into our build.gradle file, its source code looks as follows:
1dependencies {
2    testCompile(
3            'junit:junit:4.12',
4            'org.codehaus.groovy:groovy-all:2.4.4',
5            'org.spockframework:spock-core:1.0-groovy-2.4'
6    )
7}
We don’t have to add the JUnit and Groovy dependencies into our build.gradle file. However, if we leave them out, we have to use the JUnit and Groovy versions specified by Spock Core.
Additional Reading:
After we have added the required dependencies into our build.gradle file, we have to configure Gradle to compile and run our unit tests.
Compiling and Running Our Unit Tests
Because our unit tests use both Java and Groovy programming languages, we need to compile our test sources by using the Groovy plugin that extends the Java plugin and adds support for Groovy projects.
We can configure our Gradle build by following these steps:
- Apply the Groovy plugin.
- Ensure that the Java compiler accepts code that uses Java 1.8.
- Ensure that the compiled classes are compatible with Java 1.8.
After we have configured Gradle to compile and run our unit tests, the source of code of our build.gradle file looks as follows:
 1apply plugin: 'groovy'
 2
 3sourceCompatibility = 1.8
 4targetCompatibility = 1.8
 5
 6dependencies {
 7    testCompile(
 8            'junit:junit:4.12',
 9            'org.codehaus.groovy:groovy-all:2.4.4',
10            'org.spockframework:spock-core:1.0-groovy-2.4'
11    )
12}
The Groovy plugin extends the project layout of the Java plugin by adding the Groovy related directories into our Gradle build. The relevant directories are described in the following:
- The src/main/java directory contains the source code of our example application.
- The src/test/java directory contains the “normal” unit tests that use JUnit.
- The src/test/groovy directory contains the unit tests that use the Spock Framework.
Additional Reading:
We can now compile and run our unit tests by running the following command at the command prompt:
1gradle clean test
When we do this, we see that:
- The compileTestJava task is invoked. This task compiles the unit tests that are found from the src/test/java directory.
- The compileTestGroovy task is invoked. This task compiles the unit tests that are found from the src/test/groovy directory.
- The test task invokes all unit tests.
The output of this command looks as follows:
 1> gradle clean test
 2:clean
 3:compileJava
 4:compileGroovy UP-TO-DATE
 5:processResources UP-TO-DATE
 6:classes
 7:compileTestJava
 8:compileTestGroovy
 9:processTestResources UP-TO-DATE
10:testClasses
11:test
12
13BUILD SUCCESSFUL
The last thing that we have to do is to configure Gradle to create an HTML test report that describes the test results of unit tests that use the Spock Framework.
Creating an HTML Test Report
When we run our unit tests, Gradle creates an HTML test report to the build/reports/tests directory. The HTML report that describes the test results of our test class, which uses the Spock Framework, looks as follows:

If we are happy with this report, we don’t have to do anything. We can just enjoy the ride.
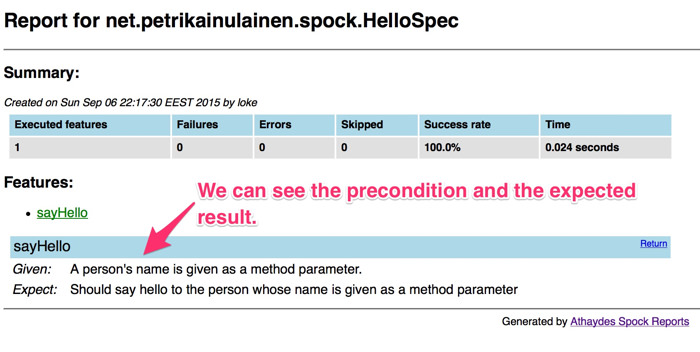
However, if we want to create a test report that describes the preconditions and the expected results of our test cases, we have to use the Spock Reports Extension. By default, it creates an HTML report for each invoked specification and and a summary that lists all invoked specifications.
We can use this Spock extension by following these steps:
- Ensure that Gradle resolves the dependencies of our build by using the Bintray’s JCenter Maven repository.
- Add the Spock Reports Extension jar file into the classpath. We can do this by adding the spock-reports dependency (version 1.2.7) into the testRuntime configuration.
After we have enabled the Spock Reports Extension, the source code of our build.gradle file looks as follows:
 1apply plugin: 'groovy'
 2
 3sourceCompatibility = 1.8
 4targetCompatibility = 1.8
 5
 6repositories {
 7    jcenter()
 8}
 9
10dependencies {
11    testCompile(
12            'junit:junit:4.12',
13            'org.codehaus.groovy:groovy-all:2.4.4',
14            'org.spockframework:spock-core:1.0-groovy-2.4',
15    )
16    testRuntime(
17            'com.athaydes:spock-reports:1.2.7'
18    )
19}
Additional Reading:
We can now run our unit tests by using the command:
1gradle clean test
When we run our unit tests, the Spock Reports Extension creates an HTML test report to the build/spock-reports directory. The HTML report that describes the test results of our test class, which uses the Spock Framework, looks as follows:
If you need to provide custom configuration to the Spock Reports Extension, you need to create a properties file to the following location (relative to the classpath):
META-INF/services/com.athaydes.spockframework.report.IReportCreator.properties
Additional Reading:
Let’s summarize what we learned from this blog post.
Summary
This blog post has taught us three things:
- We know how we can get the required dependencies with Gradle.
- We can compile and run our unit tests by using the Groovy plugin.
- If we want to create a test report that describes the preconditions and the expected results of our test cases, we have to use the Spock Reports Extension.
The next part of this tutorial gives an introduction to Spock specifications.
P.S. You can get the example of this blog post from Github.
